Setting up Mono on nginx
- Part 1 - Setting up the Virtual Machine and nginx
- Part 2 - Setting up new Website and Domain on nginx
- Part 3 - Setting up Mono on nginx
- Part 4 - Setting up a NancyFX website
- Part 5 - Setting up a ServiceStack web service
Now we get to the fun stuff, getting up Mono. I'll be demoing with Mono 2.10 but after this series I may include a 6th part on how build Mono 3.0 from source and run it.
Setting up our test page
I figured we should start with setting up our test page. Something super simple, we will create a new page that outputs a bit of server side text.
We wont deploy a bin folder or anything like that, it will be almost like deploying Classic ASP.
<%@ Page Language="C#" AutoEventWireup="true" %>

<!DOCTYPE html>
<html xmlns="http://www.w3.org/1999/xhtml">
<head runat="server">
    <title></title>
</head>
<body>
    <div>
    <% var test = "Hello World! Got an aspx page running on nginx!!!"; %>

    <%= test %>
    </div>
</body>
</html>
So we are just creating a variable named test with some test data, then outputting it to the page.
We need to navigate to our site directory by calling cd /var/www/phillip.pw followed by creating a new file in nano by calling nano test.aspx
This will open up a new nano window. Now you can type in the test code, or paste it in. Now we need to save it by calling CTRL + X followed by Y and Enter. Same thing we have been doing in the other parts.
Installing Mono
Now that our test page is ready, we can install Mono by calling apt-get install mono-complete, your window should now look like

Hit Y and Enter, and let it install... this could take a while.
Next we want to install the fastcgi-mono-server4 package. So call apt-get install mono-fastcgi-server4 and install. This package is super small so will install quickly.
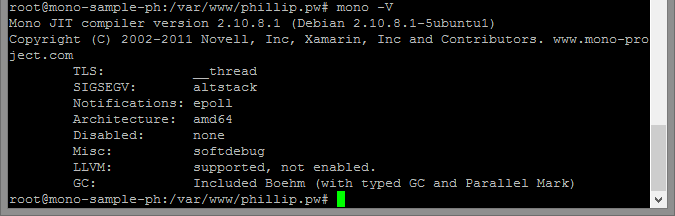
To quickly test that Mono is installed call mono -V you should get something like so
Configuring our website!
We need to head on over to the nginx server configuration. So call cd /etc/nginx/sites-available followed by nano default so we can edit our site to use the fastcgi stuff.
We need to add the fastcgi stuff, its important to note the include path. If you remember from Part 1 I mentioned the fastcgi_params file, well we need to point to that file. We will modify that next.
server {
    # the port the site is listening on
    listen 80;

    # the hostname
    server_name *.phillip.pw;

    # the path to where we host the site
    root /var/www/phillip.pw;

    # the default page
    index index.html;

    location / {
        fastcgi_index /index.html;
        fastcgi_pass 127.0.0.1:9000;
        include /etc/nginx/fastcgi_params;
    }
}
Note how the fastcgi stuff is put into a location followed by a forward slash to indicate that its location is the root. If you put it in the root of server (with no location scope) you will end up with nginx throwing an error like
root@mono-sample-ph:/var/log/mono# nginx nginx: [emerg] "fastcgi_pass" directive is not allowed here in /etc/nginx/sites-enabled/default:34
Save the file and exit.
Now drop down 1 level by calling cd .. and then calling ls to view the directory listing.

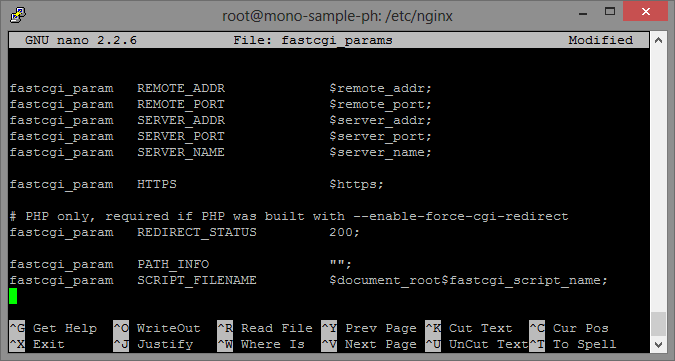
We need to modify the fastcgi_params file, we open it up in nano... nano fastcgi_params and we need to add the two following lines of code to the bottom of the file:
fastcgi_param   PATH_INFO               "";
fastcgi_param   SCRIPT_FILENAME         $document_root$fastcgi_script_name;
So you should end up with something like
Save and exit that file.
Setting up the Mono Site
So we need to configure a site in Mono as well. This part was a little confusing for me initially. Basically we need to create all of this manually.
Head back to cd /etc and call ls, in here you should see an file called init.d. Some tutorials on the internet show this file in /etc/rc.d/init.d but this is actually because some versions of Linux put it in 1 place, while other versions put it in the other. And I think those who put it in rc.d do a syslink to the root init.d version.
In any-case on Ubuntu, rc.d does not exist. So we want to navigate into init.d so call cd init.d
Create a new directory in here called mono-fastcgi by calling mkdir mono-fastcgi and then navigate to it.
Here we want to create a Web App file, this is a configuration file for our site.
Create a new file with nano... nano phillip.pw.webapp
Write the following text into the file:
<apps>
<web-application>
        <name>phillip.pw</name>
        <vhost>*</vhost>
        <vport>80</vport>
        <vpath>/</vpath>
        <path>/var/www/phillip.pw</path>
</web-application>
</apps>
All these names and paths should be familiar if you've been following from Parts 1/2
Setting up the log files
Now we need to navigate to cd /var/log and create a new directory called mono mkdir mono, navigate into the directory, cd mono, and create a new file called fastcgi.log. To create a new file just call > fastcgi.log which will create a new empty file.
Registering fastcgi-mono-server
Lastly we need to configure the server. We can start the FastCGI background process by calling
fastcgi-mono-server4
    --appconfigdir /etc/init.d/mono-fastcgi
    /socket=tcp:127.0.0.1:9000
    /logfile=/var/log/mono/fastcgi.log &
(if it's hard to scroll, here's the same line broken down into pieces)
fastcgi-mono-server4
--appconfigdir /etc/init.d/mono-fastcgi
/socket=tcp:127.0.0.1:9000
/logfile=/var/log/mono/fastcgi.log &
Notice the paths match those we just created.
You should have a terminal that looks like:

Now give nginx a restart by calling service nginx restart
The big test
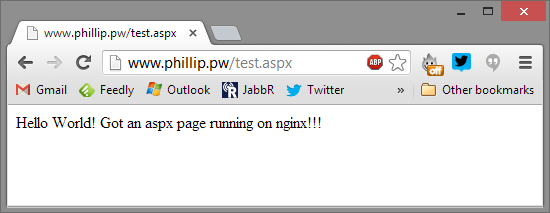
BAM Just like that we now have an ASPX page running on Mono, on nginx, on Ubuntu, on Azure!
comments powered by Disqus