OAuth with ASP.NET MVC and WorldDomination.Web.Authentication
This post is a follow on from my previous post OAuth with NancyFX and WorldDomination.Web.Authentication except this demonstrates how you can use WorldDomination.Web.Authentication with ASP.NET MVC, writing only minimal code in the process.
To save you jumping to the other post, I'll quote myself:
One of the biggest pains of building websites, in my opinion, is implementing OAuth providers, it's often fiddly, doesn't work, and frameworks that are created to try make things easier, don't seem to make it easier.
So PureKrome and myself decided to create WorldDomination: Web Authentication
The idea behind this framework is to keep it super simple to implement OAuth into your website, without the bloat. The core framework ONLY deals with Google, Twitter, and Facebook authentication. It doesn't try to create a fancy UI for you, it doesn't require you to write lots and lots of code. You simply give it some info, it redirects, it comes back and gives you the authentication info.
So without further adieu...
Installing
Installing the library for MVC requires installing the MVC specific library.
PM> Install-Package WorldDomination.Web.Authentication.Mvc
This will install:
- WorldDomination.Web.Authentication.Mvc
- WorldDomination.Web.Authentication
- RestSharp
The first package is the ASP.NET MVC provider, this wires up all the routes and handles the redirect and callback.
The second package is the actual implementation, this has no dependency on NancyContext or System.Web
The last package is required by WorldDomination.Web.Authentication to process the callback and deserialize the response.
Configuring
Now that it's installed, we need to configure it, this is done one of two ways, by adding the information to the web.config, or by registering the information in the Global.asax
I'm going to show the web.config way, but you can visit the github wiki for WorldDomination.Web.Authentication on information to configure via the Global.asax.
In the web.config add a config section like so
<section name="authenticationProviders"
         type="WorldDomination.Web.Authentication.Config.ProviderConfiguration, WorldDomination.Web.Authentication" />
Now add the authenticationProviders element.
<authenticationProviders>
  <providers>
    <add name="Facebook" key="470874...41" secret="02bb584...332fe2" />
    <add name="Google" key="58714009...ent.com" secret="npk...ooxCEY" />
    <add name="Twitter" key="Rb7qNNP...znFTbF6Q" secret="pP...7hu9c" />
  </providers>
</authenticationProviders>
Note: These are the key/secret you get when you register your application with the providers.
You can get the key/secret registering your apps:
- Facebook: http://developers.facebook.com/docs/howtos/login/server-side-login/
- Twitter: https://dev.twitter.com/
- Google: https://code.google.com/apis/console/?pli=1#access
Note: Please refer to the 'Adding some buttons' section on the URLs for use when registering.
Registering the routes
Unlike Nancy, we need to tell Mvc to register the routes, if you don't mind using the built in routes you can simply call the registration, passing in the route table, and you will get the default routes described in the rest of this blog post.
WorldDominationRouteConfig.RegisterRoutes(RouteTable.Routes);
Note: This must be registered BEFORE your own routes, otherwise your default route will override the WorldDomination specific routes and then you will end up with issues such as the controller doesn't exist.
The routes registered are two specific ones:
routes.MapRoute(
    name: "WorldDominationAutomatedMvc-Redirect",
    url: "authentication/redirect/{providerkey}/{additionaldata}",
    defaults: new { controller = "WorldDominationAuthentication", action = "RedirectToProvider", additionaldata = UrlParameter.Optional }
);
routes.MapRoute(
    name: "WorldDominationAutomatedMvc-AuthenticateCallback",
    url: "authentication/authenticatecallback",
    defaults: new { controller = "WorldDominationAuthentication", action = "AuthenticateCallback" }
);
Alternatively if you want to specify your own routes, you can copy the route registration above and define your own paths.
Implementing your callback
Now you need to implement a callback, this callback is what YOU want to do with the result from a successful (or failed) authentication, you need to implement this because we don't know what you have planned, if you want to create a session, set a cookie, use form authentication, what ever, that's up to you.
To do this you can create a new class and implement the interface IAuthenticationCallbackProvider
public class SampleCallbackProvider : IAuthenticationCallbackProvider
{
    public ActionResult Process(HttpContextBase context, AuthenticateCallbackData model)
    {
        return new ViewResult
        {
            ViewName = "AuthenticateCallback",
            ViewData = new ViewDataDictionary(model)
        };
    }
}
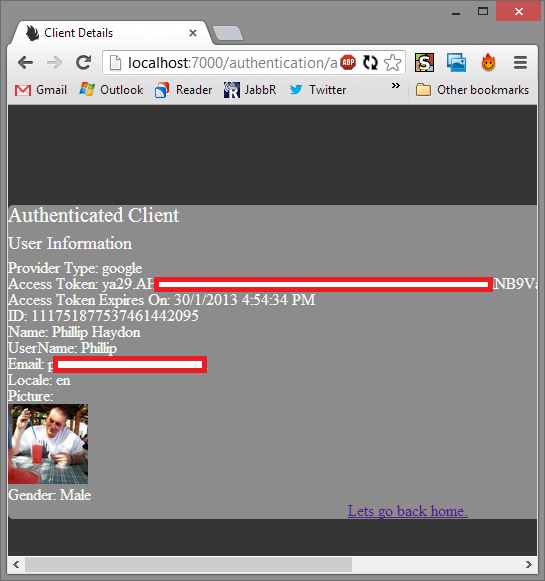
This example will simply respond with the view AuthenticateCallback and pass it the model with the data returned from the provider. Ideally you would check to see if the user is new, or if you need to add him to your database, or authenticate him with your system.
You can take a look at the implementation used by JabbR here, which I've mirrored as a gist here in-case it is changed or moved and the link becomes dead.
Although the JabbR implementation is for NancyFX, it will give you an idea of what you can achieve. The main difference is the MVC version will pass you the HttpContext of the current controller, while the NancyFX one passes you the NancyModule. The implementation would be pretty much identical.
Adding some buttons
Last of all, you need to add some buttons to the screen. This is where you have to link to some specific URLs.
Note: These links will be configurable in the future, but for now they are hard-coded.
The two URLs used by the system are:
- Redirect: /authentication/redirect/provider key
- Callback: /authentication/authenticatecallback?providerkey=provider key
Examples: The links you would add to your page would be similar to:
<a href="/authentication/redirect/Twitter"><img src="/Content/twitter_32.png" /></a>
<a href="/authentication/redirect/Facebook"><img src="/Content/facebook_32.png" /></a>
<a href="/authentication/redirect/Google"><img src="/Content/google_32.png" /></a>
These links are just normal hyperlinks, giving you absolute freedom and flexibility to style them any way you want. Because we have absolutely NO involvement in the generation of the links, we cannot get in the way.
All you need to do is ensure that the links provided to us look like the above.
Your callback urls would end up looking like:
- /authentication/authenticatecallback?providerkey=twitter
- /authentication/authenticatecallback?providerkey=facebook
- /authentication/authenticatecallback?providerkey=google
Note: The urls are forced to be lowercase because Google is case sensitive, so when registering your app with google please make sure the url is registered all lowercase.
And you're done!
Now you can run your app:
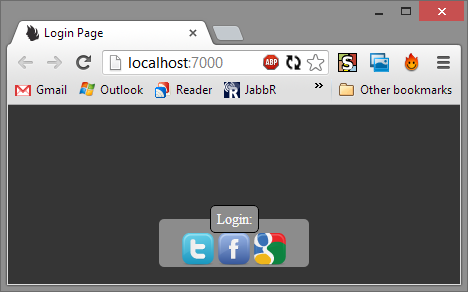
We click on Google:
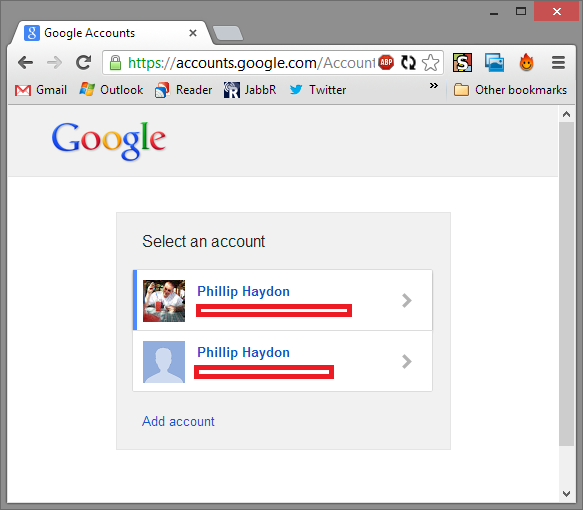
And we get redirected back to the website after allowing the authentication with Google:
That's all there is to it.
The sample can be found on github here:
You can find the source code on github:
And the Nuget packages
- http://www.nuget.org/packages/WorldDomination.Web.Authentication/
- http://www.nuget.org/packages/WorldDomination.Web.Authentication.Mvc/