Windows Store App with Caliburn.Micro - Getting Started
So I've been learning Windows 8 development recently, specifically with C#/XAML, and Caliburn.Micro for the MVVM goodness. This is all brand new stuff for me, never done any WPF, Silverlight or Windows Phone dev. So I figured it's a good chance to blog what I'm learning.
In this post I want to show you how to get up and running.
I started by reading the blog posts over at Mindscape.
http://www.mindscapehq.com/blog/index.php/2012/01/12/caliburn-micro-part-1-getting-started/
(great series by @Jason, list of links at bottom of this post)
The downside is they were very WPF centric, and a few things getting started have changed. There's no bootstrapper for example.
So, here's my blog series.
Before getting started
The most important thing to note about building Windows Store App's is that you can't just reference any old assembly, it has to be either developed for Windows Store, or be created as a portable library. This is because WinRT (Windows Runtime) doesn't contain all the same namespaces as the .NET framework.
Getting Started
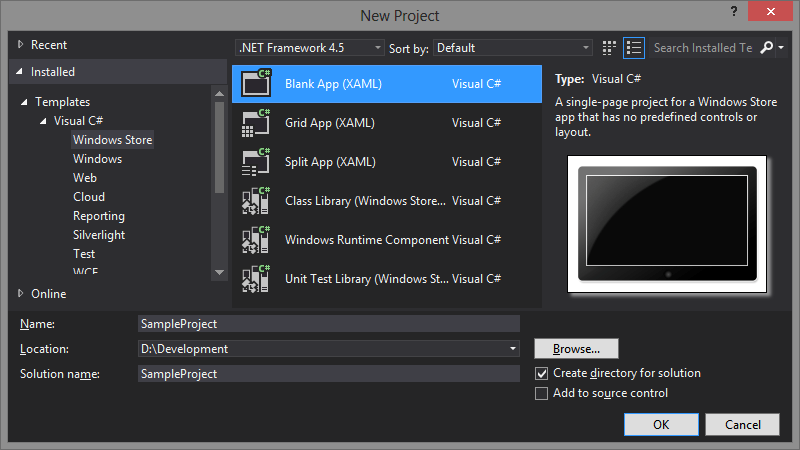
Create a new Blank App (XAML)
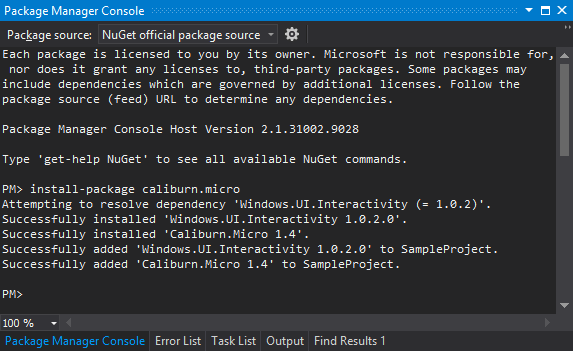
Next you're going to need to install Caliburn.Micro, I use Nuget for this, but you can download the package and reference it manually from codeplex.
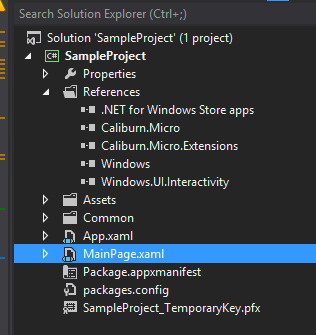
Your solution should look something like this:
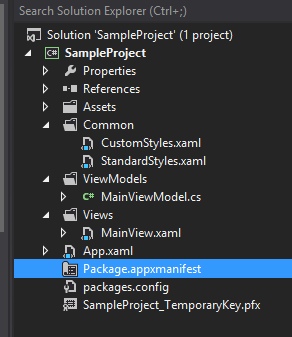
The first thing we can do is delete the MainPage.xaml, and add a couple of folder, Views and ViewModels. You can also add your own Styles file too. While you're at it, add a MainView.xaml and MainViewModel.cs to their respected folders.
Let's start writing/fixing code!
App.xaml
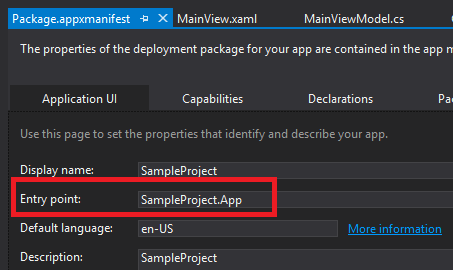
This file is the entry point to your application. It's the very first file that is executed, it's best to leave the file name as is, but if you wish to change it. Then you need to open your Package.appxmanifest file and modify the entry point.
For now, don't worry about changing this, I'll try cover this in future posts.
First thing we want to do is open up the XAML file, not the code file. We can strip back the comments and include our custom styles resource.
Next we want to add in a namespace attribute:
xmlns:caliburn="using:Caliburn.Micro"
This is like adding custom controls to a web.config file or declaring the custom controls in your page, then accessing them via the prefix you define.
This allows us to modify the root Element and make it a Caliburn Application.
What you should end up with is the following:
<caliburn:CaliburnApplication
    x:Class="SampleProject.App"
    xmlns="http://schemas.microsoft.com/winfx/2006/xaml/presentation"
    xmlns:x="http://schemas.microsoft.com/winfx/2006/xaml"
    xmlns:local="using:SampleProject"
    xmlns:caliburn="using:Caliburn.Micro">
    <Application.Resources>
        <ResourceDictionary>
            <ResourceDictionary.MergedDictionaries>
                <ResourceDictionary Source="Common/StandardStyles.xaml"/>
                <ResourceDictionary Source="Common/CustomStyles.xaml"/>
            </ResourceDictionary.MergedDictionaries>
        </ResourceDictionary>
    </Application.Resources>
</caliburn:CaliburnApplication>
The next thing you want to do is open up the code file for the App.xaml file. By default this has a LOT of stuff in it, that we don't need at all.
Below is the recommendation sample from Caliburn.Micro documentation, it does quite a bit including having a basic IoC container for WinRT, and handles View or ViewModel first approach.
Note: Caliburn.Micro 1.4.1 has a breaking change, please read the updated post for info on updating the code below to be compatiable with v1.4.1
using System;
using System.Collections.Generic;
using Caliburn.Micro;
using SampleProject.Views;
using Windows.ApplicationModel.Activation;
using Windows.UI.Xaml.Controls;
namespace SampleProject
{
    sealed partial class App
    {
        private WinRTContainer container;

        public App()
        {
            InitializeComponent();
        }

        protected override void Configure()
        {
            container = new WinRTContainer();
            container.RegisterWinRTServices();
        }

        protected override object GetInstance(Type service, string key)
        {
            return container.GetInstance(service, key);
        }

        protected override IEnumerable<object> GetAllInstances(Type service)
        {
            return container.GetAllInstances(service);
        }

        protected override void BuildUp(object instance)
        {
            container.BuildUp(instance);
        }

        protected override void PrepareViewFirst(Frame rootFrame)
        {
            container.RegisterNavigationService(rootFrame);
        }

        protected override void OnLaunched(LaunchActivatedEventArgs args)
        {
            DisplayRootView<MainView>();
        }
    }
}
The very last method 'OnLaunched' has the class to our Main View, this tells the application that the first thing we will see will be the MainView.
Next lets look at the ViewModel.
MainViewModel.cs
In this file, strip everything back and inherit 'Screen'
Although this file will be loaded, it's not going to do anything just yet. At least not for this sample.
MainView.xaml
Now lets look at the view, open up the xaml file. This file should have been created with as a Blank page, once open, add a TextBlock with the text Hello World.
<Page x:Class="SampleProject.Views.MainView"
      xmlns="http://schemas.microsoft.com/winfx/2006/xaml/presentation"
      xmlns:x="http://schemas.microsoft.com/winfx/2006/xaml"
      xmlns:d="http://schemas.microsoft.com/expression/blend/2008"
      xmlns:local="using:SampleProject.Views"
      xmlns:mc="http://schemas.openxmlformats.org/markup-compatibility/2006"
      mc:Ignorable="d">
    <Grid Background="{StaticResource ApplicationPageBackgroundThemeBrush}">
        <TextBlock Text="Hello World" />
    </Grid>
</Page>
We don't need to modify the code file for this.
Now we should be able to run app. There is 3 possible ways to run:
Local Machine
Using a Local Machine means the application will be loaded into your Start Screen and automatically be run.
Simulator
The simulator will open up a simulation app which resembles a tablet, this gives a bunch of options to simulate different gestures such as using touch and pinch etc.
Remote Machine
The remote machine option requires the Remote SDK to be installed and running on a remote machine. This is handy for testing on an actual device. I'll cover this next week when I explain how to setup remote debugging.
I suggest selecting Simulator and pressing F5. Assuming you've followed along you should get this:
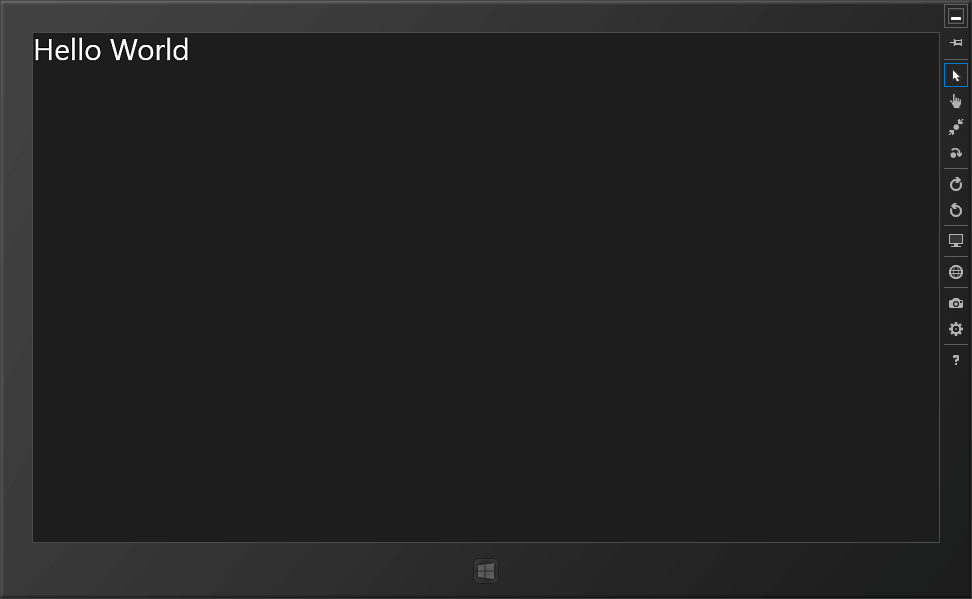
Note: I increased the font size for the purpose of taking a screen grab :)
And that's it, so far all we've done is configure Caliburn and tell it to load a view, we aren't really utilizing it yet but we will in the future!
As mentioned here's Jason's post over at Mindscape:
- Caliburn Micro Part 1: Getting Started
- Caliburn Micro Part 2: Data Binding and Events
- Caliburn Micro Part 3: More About Events and Parameters
- Caliburn Micro Part 4: The Event Aggregator
- Caliburn Micro Part 5: The Window Manager